
My goal with these meal plans is to try and highlight a few seasonal ingredients. Batch cooking with what's in season not only tastes delicious, but it's also more affordable, nutritionally dense, and better for the environment. It's easy to know what's in season in your area by visiting a farmer's market and seeing what's available. Here's just some of the best produce that's available in April:
- apples
- artichokes
- asparagus
- broccoli
- carrots
- citrus
- kale
- radishes
- rhubarb
- spinach
- swiss chard
Seasonal Ingredient Spotlight
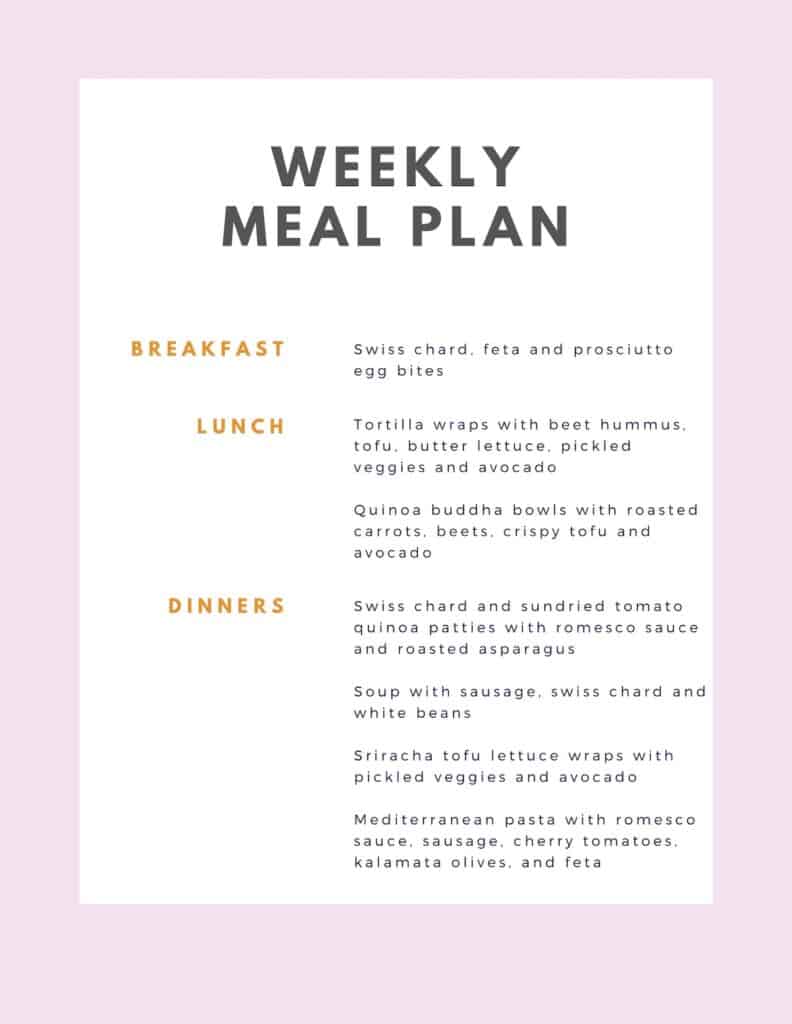
For this week's meal plan, I'll be highlighting swiss chard! I wanted to pick something that would stretch people outside of their normal cooking comfort zones.
We will be using Swiss chard in prosciutto and feta egg bites, a sausage, white bean and chard soup, and in sun-dried tomato and chard quinoa patties.
Here's a few reasons I know you'll love cooking with chard.
- Flavor: It is much less bitter than kale and sautéing it will help tp mellow any bitterness.
- Texture: Because the leaves are so hearty, it can withstand the high temp of cooking and works great in soups. It has a nice toothsome bite to it, much like a lacinato kale.
- Nutrients: As a dark green, it's packed with two and a half times your daily requirement for Vitamin K, and chockfull of Vitamins A and C. It's high in iron, potassium and magnesium.
- Versatility: You'll see from these recipes that you can incorporate chard into your diet in a variety of ways.
- Beautiful: You can find varieties of chard that have gorgeous bright and colorful stems!
- Easy to grow: These hearty greens are extremely easy to grow and perfect for the novice veggie gardener.
Let's get cooking!
Ingredients to Prep
Here are the ingredients we will be prepping in advance for this week's meals.
- quinoa
- lemon beet hummus
- romesco sauce
- roasted carrots and beets
- crispy tofu
- pickled veggies (carrot/cucumber/red onion/daikon)
- sautéed Swiss chard
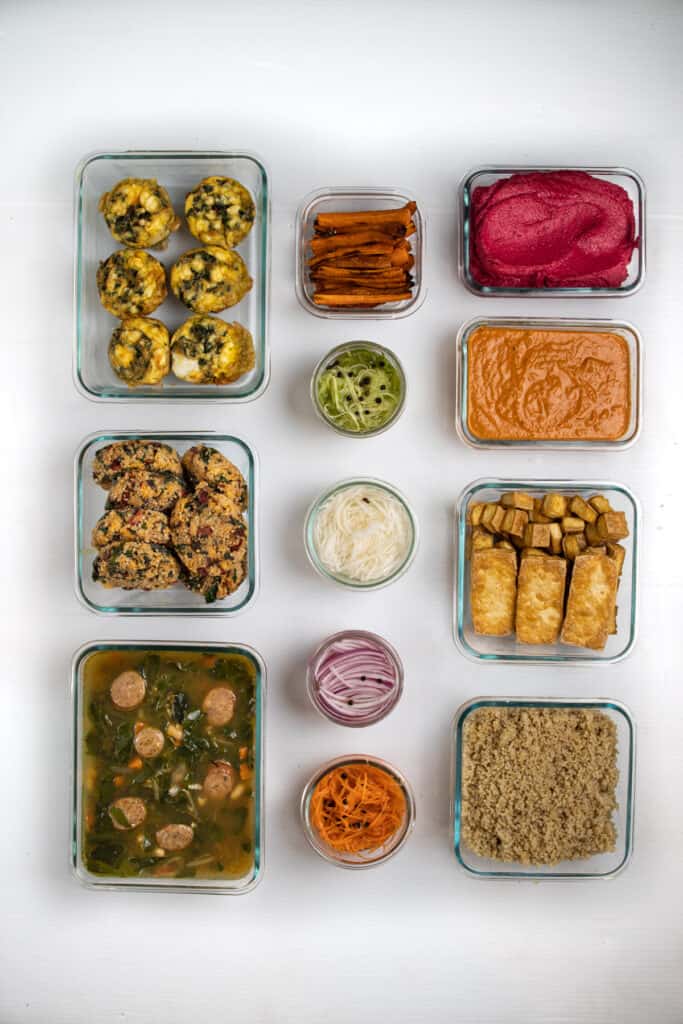
Once we have the sautéed chard, we will use that to assemble three of the menu items for the week: soup, egg bites and quinoa patties.
Estimated cooking time: 2 hours
Mix and Match Menu
Let's Start Batch Cooking!
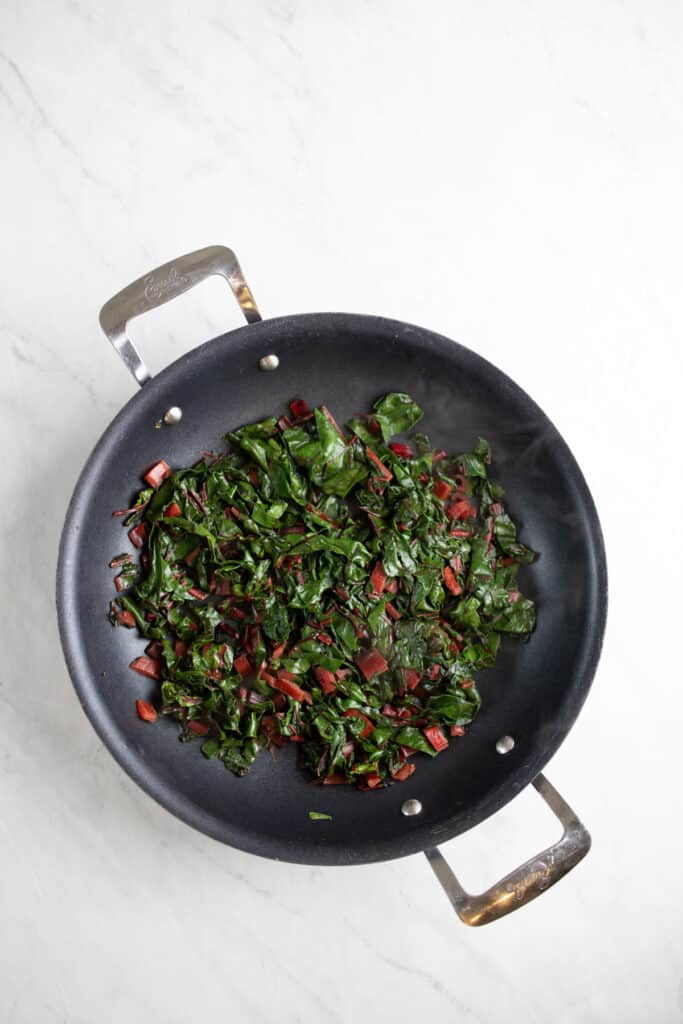
Swiss chard
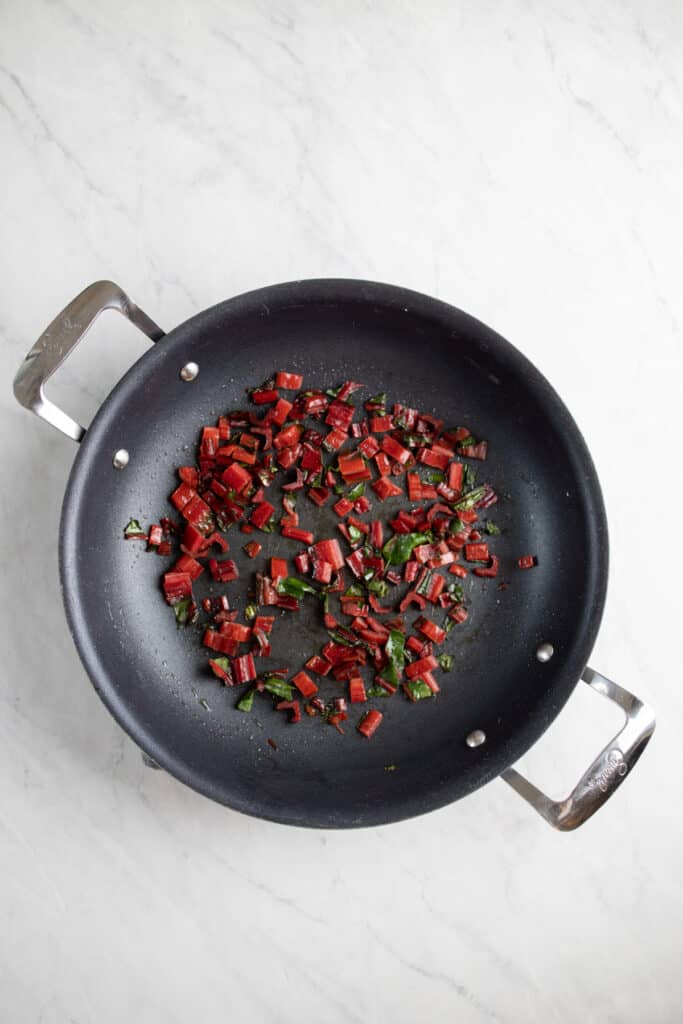
You don't have to use the stems when cooking Swiss chard, but they are delicious, mild and add an extra layer of texture so why wouldn't you?!? Plus, they add a beautiful vibrant color to the dish.
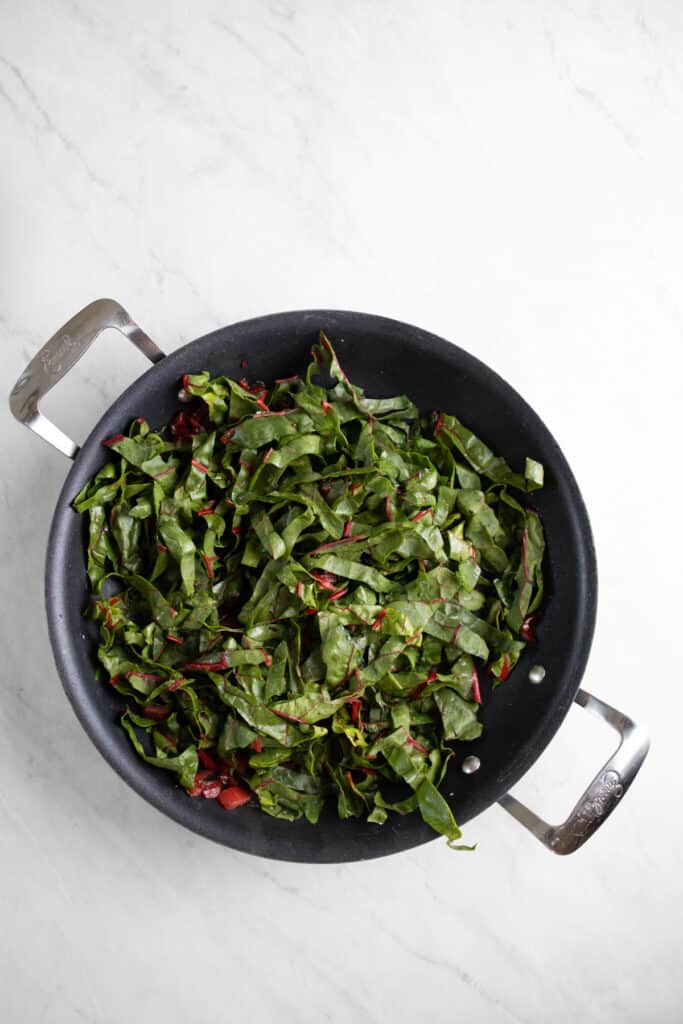
You'll need to cook the stems longer than the leaves because they are tougher. I recommend cutting the stems away from the leaves, and slicing them into ¼-1/2" widths. Then roughly chop the leaves into 1" chunks and keep them separate for now.
In a large skillet over medium-low heat, warm a tablespoon of olive or avocado oil. Sauté the stems only for roughly 3-4 minutes to give them a head start. Then you can add the leaves to the skillet with a pinch of salt and pepper and cook another 3-4 minutes or until tender.
At this point you could add some minced garlic and red pepper flakes and enjoy this sautéed chard as a tasty side dish all on its own!

start with just the stems add the leaves after 3-4 min cook another 3-4 min until wilted
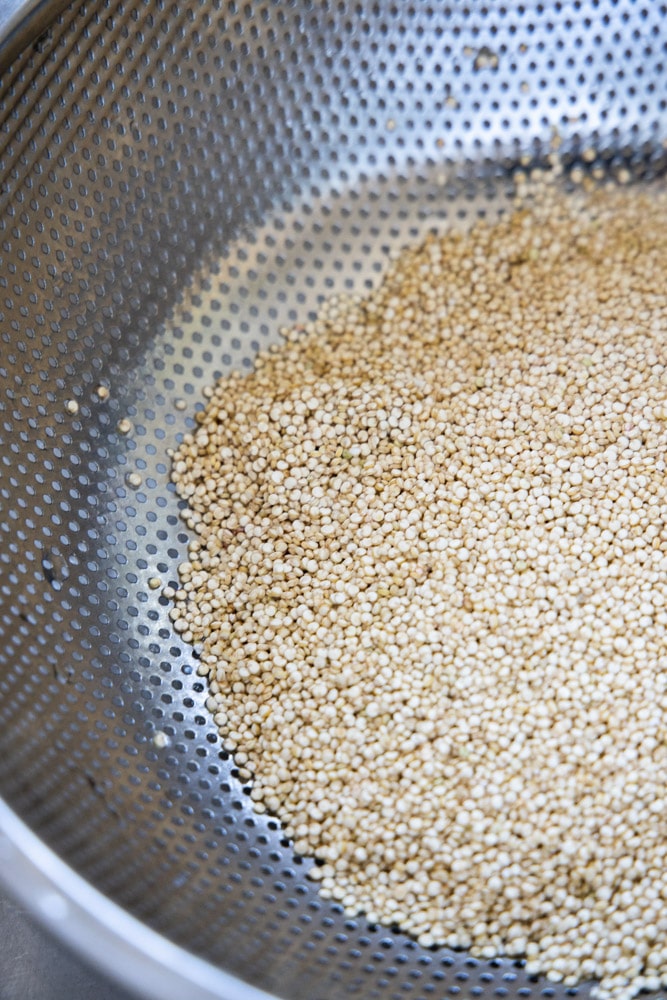
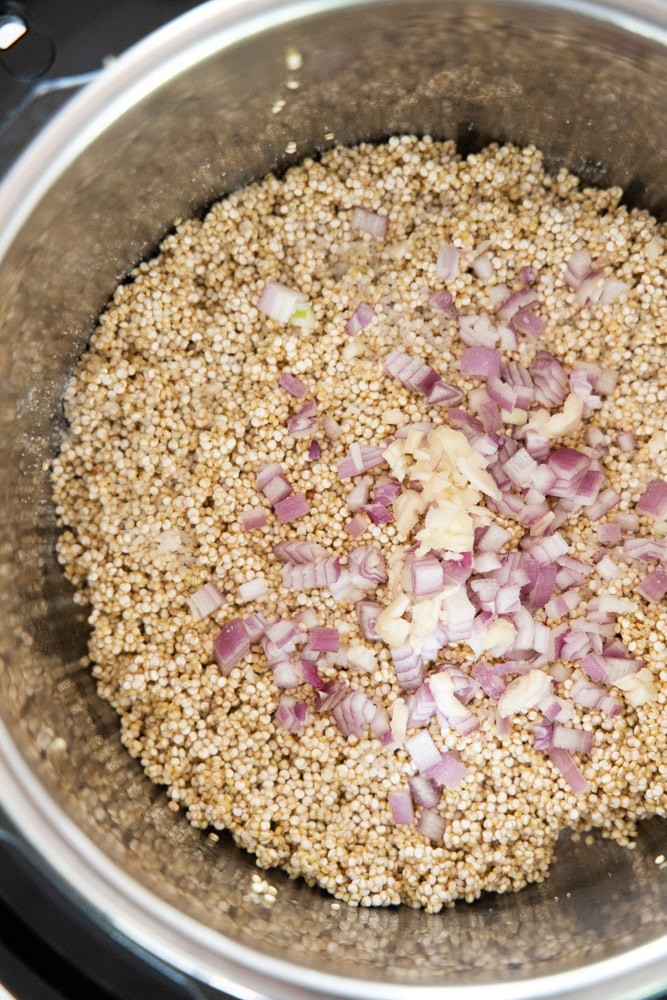
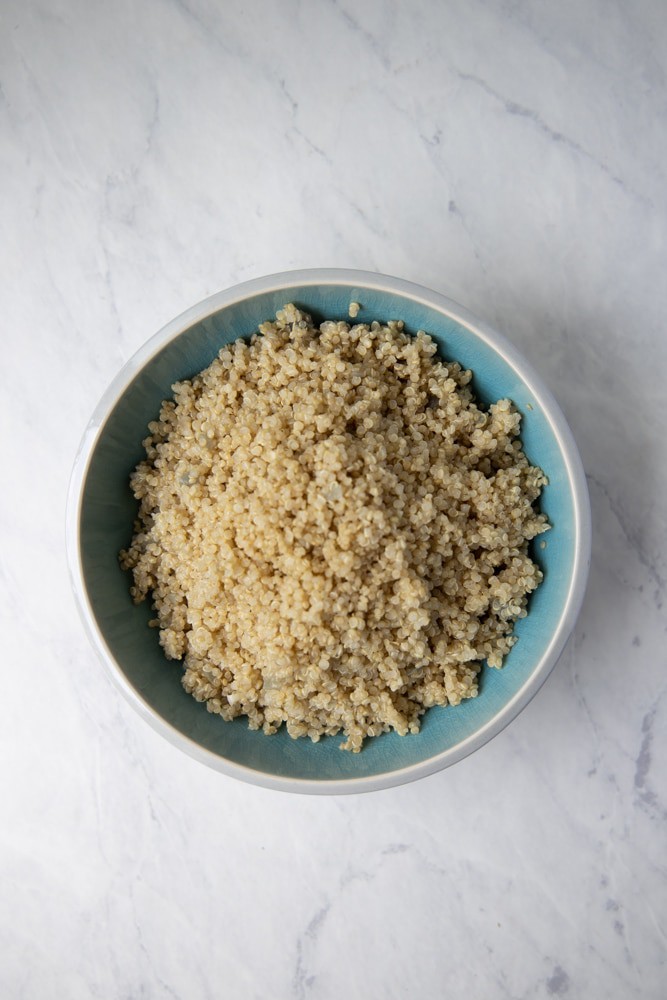
Quinoa
I like to start prepping the quinoa first because we will need it to cool so we can then assemble the sundried tomato and Swiss chard quinoa patties.
Personally, I love using my Instant Pot to cook grains like quinoa. Not only does it keep my stovetop clear so I can use that to prep other ingredients, but it's totally hands off so I don't have to babysit it while it works it's magic. I have a recipe that makes perfectly al dente quinoa every time with a 1 min cook time (realistically it takes 15 minutes with the time it takes to build pressure).
The key to perfect quinoa is:
- rinse quinoa very well before cooking
- use chicken stock instead of water, or add garlic and onion, for a flavor boost
- once cooking time is up, spread in a thin layer on a cookie sheet to cool so it doesn't get mushy
If you don't have an instant pot, you can follow this method for cooking quinoa in a pan on your stovetop.

rinse well first add aromatics for extra flavor enjoy!
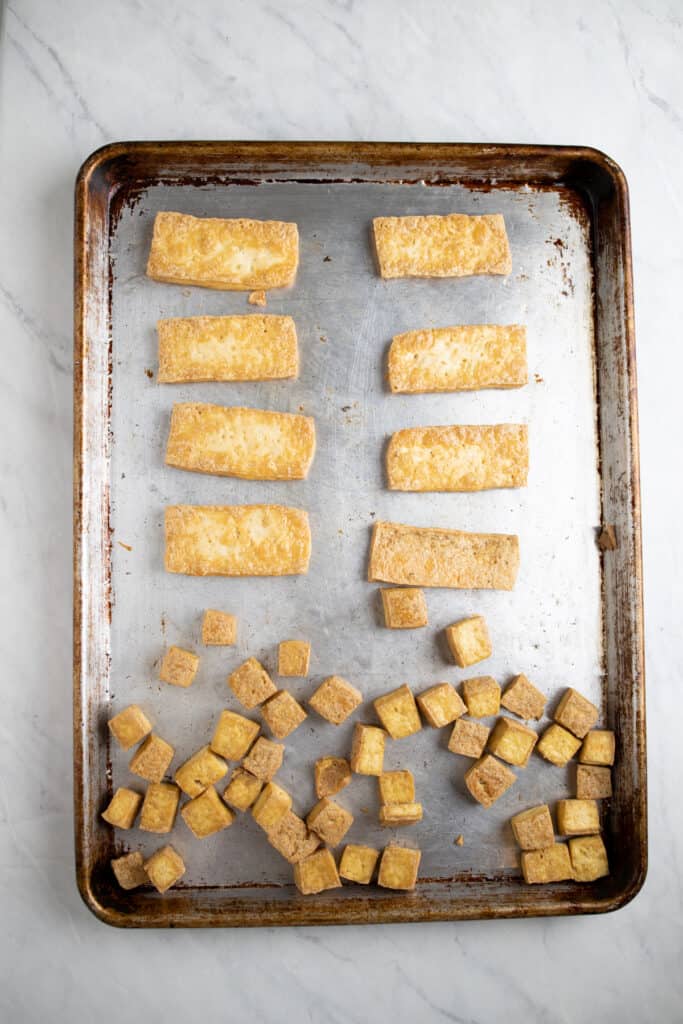
Crispy Tofu
I like the cut the tofu in two different ways because I find the slabs of tofu work well in lettuce and tortilla wraps, whereas the cubes of tofu work best in bowls and salads. Luckily, they take the same amount of time to cook so I prep them on the same sheet pan.
For the best results, you want to purchase extra firm tofu which has the least amount of water content. You'll still need to squeeze out as much water as possible to get crispy results though.
- Take your tofu out of the package
- Sandwich the tofu block between two thick layers of paper towels (think 5-6 paper towels) on the top and bottom of the tofu
- Then take a skillet or sheet pan, place it on top of the tofu and weigh it down with a few heavy cans to help squeeze out the water.
- Replace the paper towels after 15 minutes because they will be soaked at that point.
- Squish for another 15 minutes and you will be good to go.
Preheat your oven to 400 degrees. Toss your cubed and sliced tofu (1 package worth) with 1.5tbsp of sesame oil and 1.5 tablespoon of avocado oil or another light cooking oil. Season with salt and pepper and spread in a single layer. Bake for roughly 30 minutes, tossing every 10 minutes to ensure even browning, or until crispy on the outside.
*If you like crispy tofu, you'll love this summery and fresh mango spring roll bowl recipe too!
Roasted Carrots
As long as you have the oven cranked to 400 degrees and the tofu is cooking away, it's the perfect time to roast some carrots! I like to simply toss them with olive oil, salt and pepper, but a little garlic powder wouldn't hurt either. We will be using these carrots in a buddha bowl for lunches or dinners.
They will take about 20-25 minutes to roast until they are soft and starting to brown.
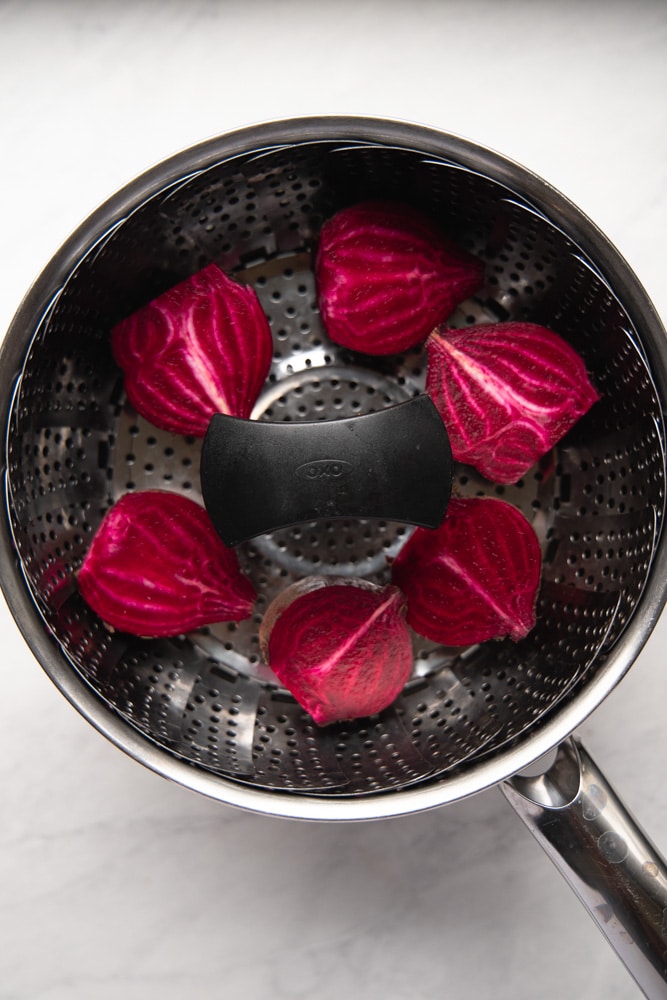
Steamed Beets
Steaming beets is actually my favorite way to prepare them because it only takes 15-20 minutes. Roasting them is also a great way to prepare them but you're constantly having to unwrap them from their aluminum foil wrapping to check them for doneness.
I use a sauce pan with a tight fitting lid and a steamer basket like this one. Depending on the size of the beets, I will often halve them as well. After 15 minutes of steaming away, I will check them with a fork for doneness.
They are easiest to peel while they're still very warm. All you have to do is rub them around inside a paper towel to loosen the skins. Just beware that they stain your skin (and anything else they come in contact with) easily!
You can find the full recipe for preparing steamed or roasted beets here.
For this menu, we will be using half of the steamed beets to make a vibrant and creamy lemon beet hummus, and the rest will get sliced up for buddha bowls.
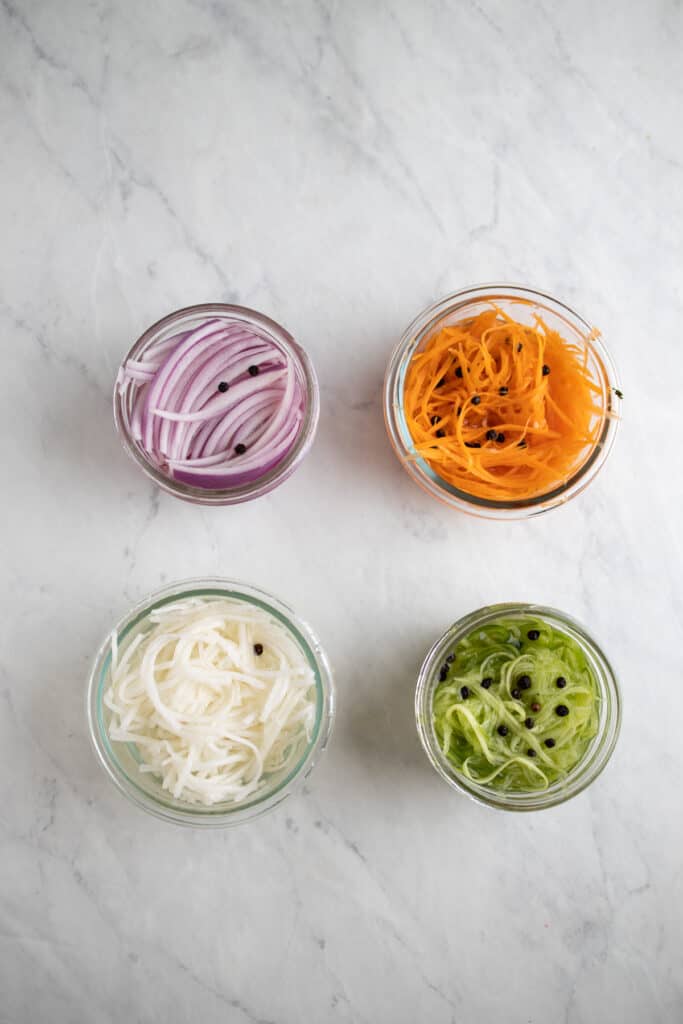
Pickled Veggies
Pickled veggies are something I love to keep in my fridge at all times. They are such an easy way to add a punch of flavor to salads, tacos, you name it. I like to use a mix of carrots, cucumber, daikon radish and red onion but I keep them in separate containers so the pink red onion color doesn't bleed into the other veggies.
In a small saucepan, heat ½ a cup of rice wine vinegar, 1 cup of water, 1 tablespoon of white sugar and 1 teaspoon of black peppercorns over medium heat. Once the sugar has sugar has dissolved you can remove it from the heat.
I used a julienne peeler but you can also julienne the veggies in small strips with a knife if your knife skills are up to snuff!
Place the veggies in separate containers, like these small mason jars, and pour the cooled pickling liquid over the top. They will last for a week in the fridge!
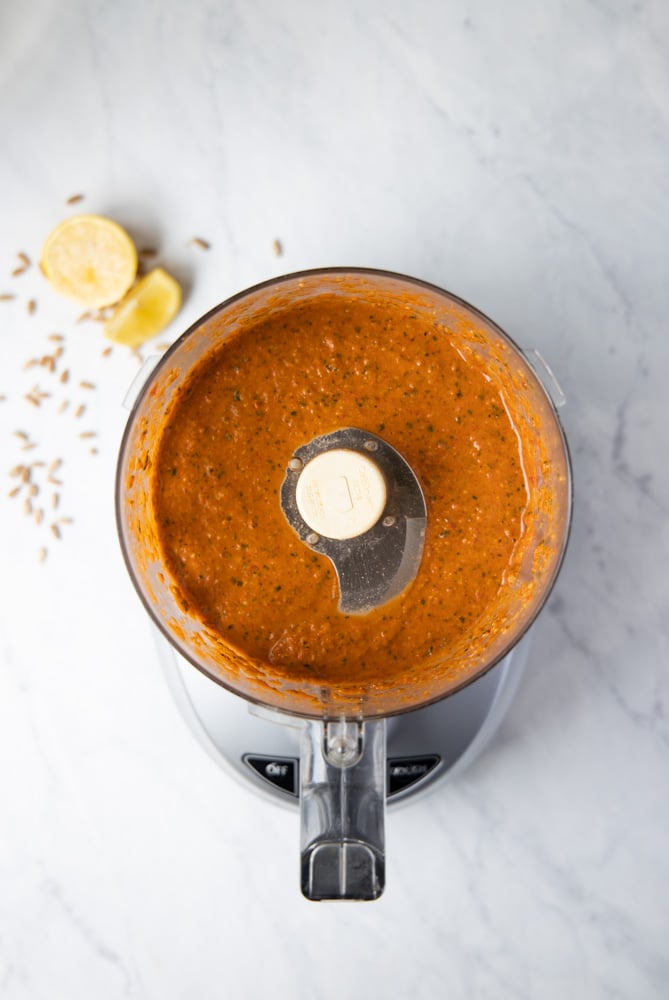
Romesco Sauce
This romesco sauce is such a deliciously creamy and flavor packed sauce that just so happens to be vegan, dairy free, AND nut free because it uses sunflower seeds. I love it for how versatile it is! This week, we'll be using it as a sauce for our quinoa patties as well as a pasta dish.
Using either a blender or food processor (blender will yield a more creamy result, processor will be more chunky), combine all these ingredients and blend until combined!
- 1 cup roasted red peppers
- ½ cup of fresh basil
- 4 whole cloves of garlic, peeled
- ¼ roasted sunflower seeds
- 2 tablespoon tomato paste
- 1 whole lemon, zested and juiced
- 1 teaspoon smoked paprika
- 1 ½ teaspoon kosher salt
- ¼ teaspoon crushed red pepper flakes
- ¼ cup extra virgin olive oil


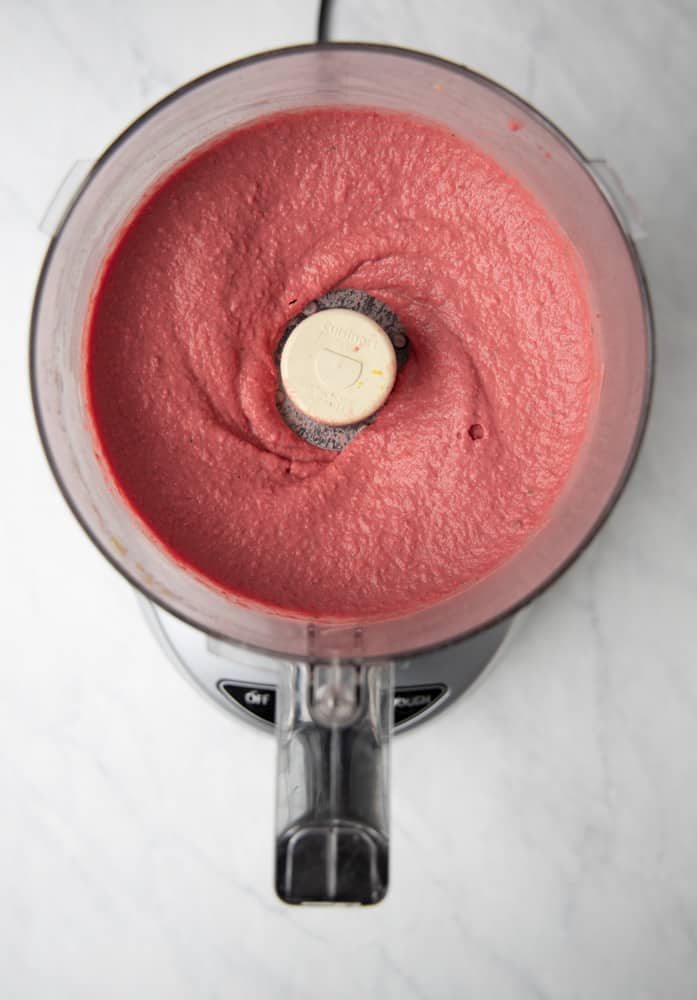
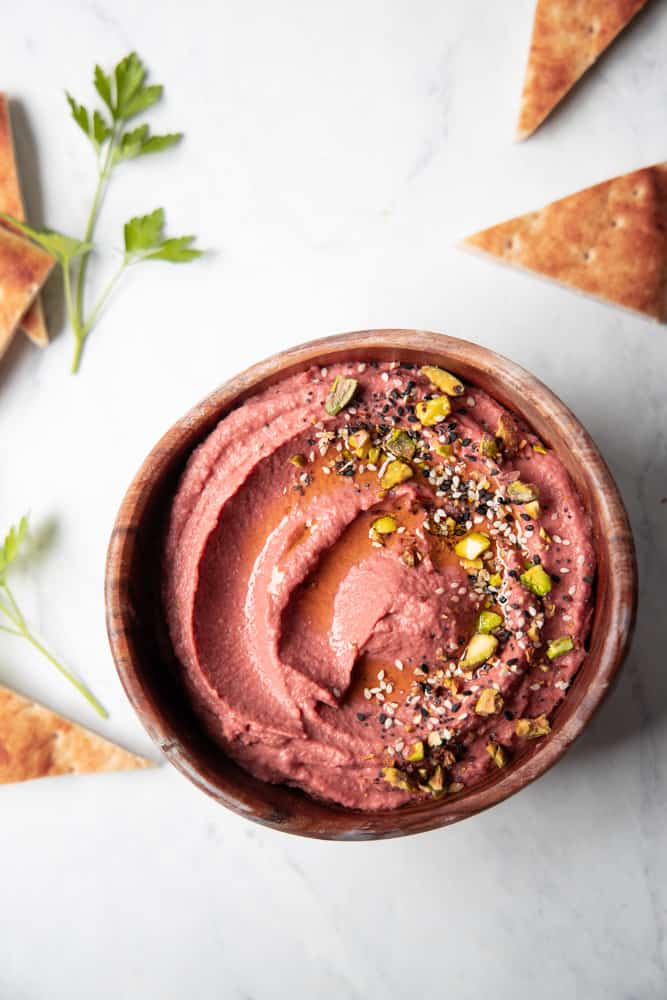
Lemon Beet Hummus
Once you have steamed and peeled your beets, they are ready to make this luxurious and vibrant lemon beet hummus! You can find the full recipe here but it's super easy. All you have to do is combine the following ingredients in a food processor:
- 8 oz of steamed beets
- 1 12oz can of garbanzo beans, rinsed and drained, loose skins removed
- 1 large lemon, zested and juiced
- ¼ cup tahini
- 2 whole cloves of garlic, peeled
- 2 tablespoon fresh parsley (optional)
- ½ teaspoon ground cumin
- 1 teaspoon kosher salt
- ¼-1/2 cup of extra virgin olive oil
Blend until smooth, adding water to thin if necessary. The more beets you add, the more bright and purple the color it will yield! You can totally use pre-steamed beets you can buy in the store but the flavor and color won't be as vibrant.
If you make extra beets, I recommend freezing them and throwing them into smoothies like this tasty raspberry coconut beet smoothie!
Breakfast Meal Prep
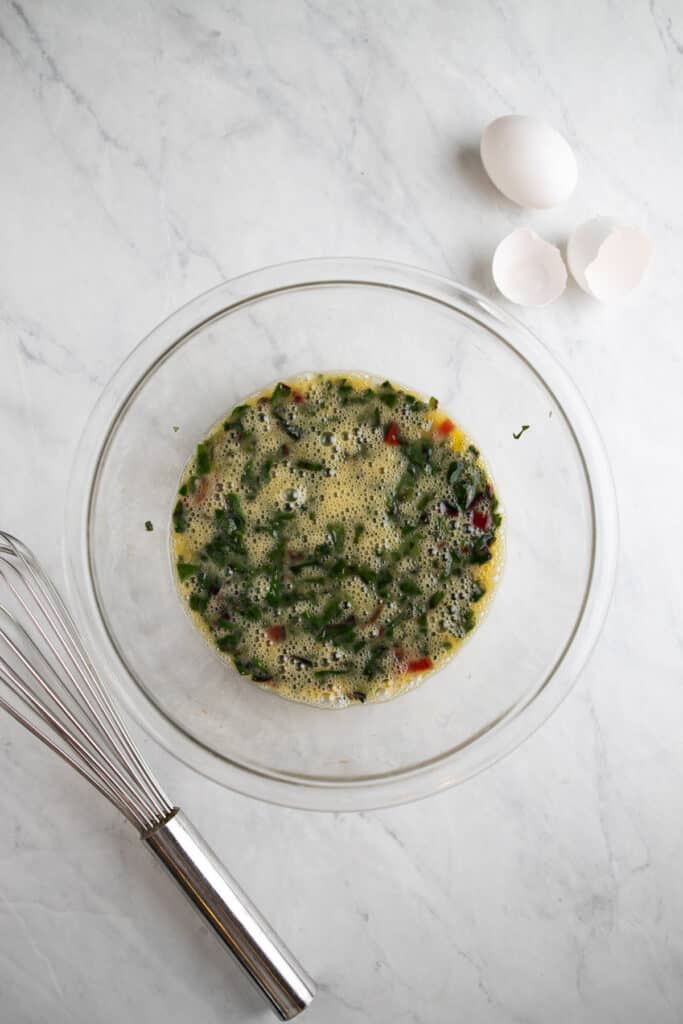
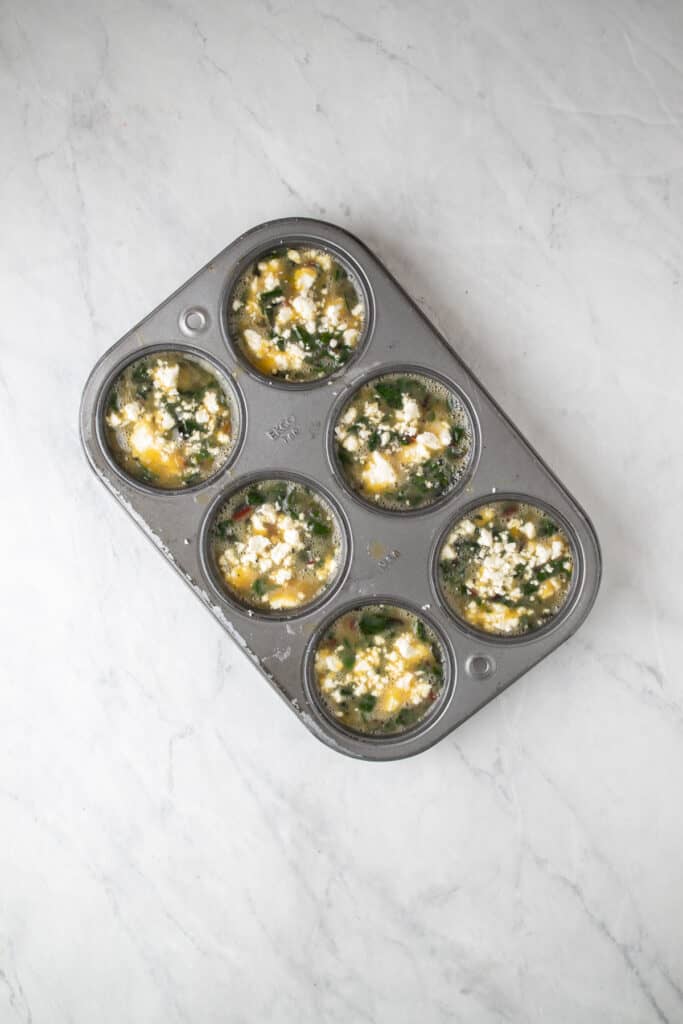
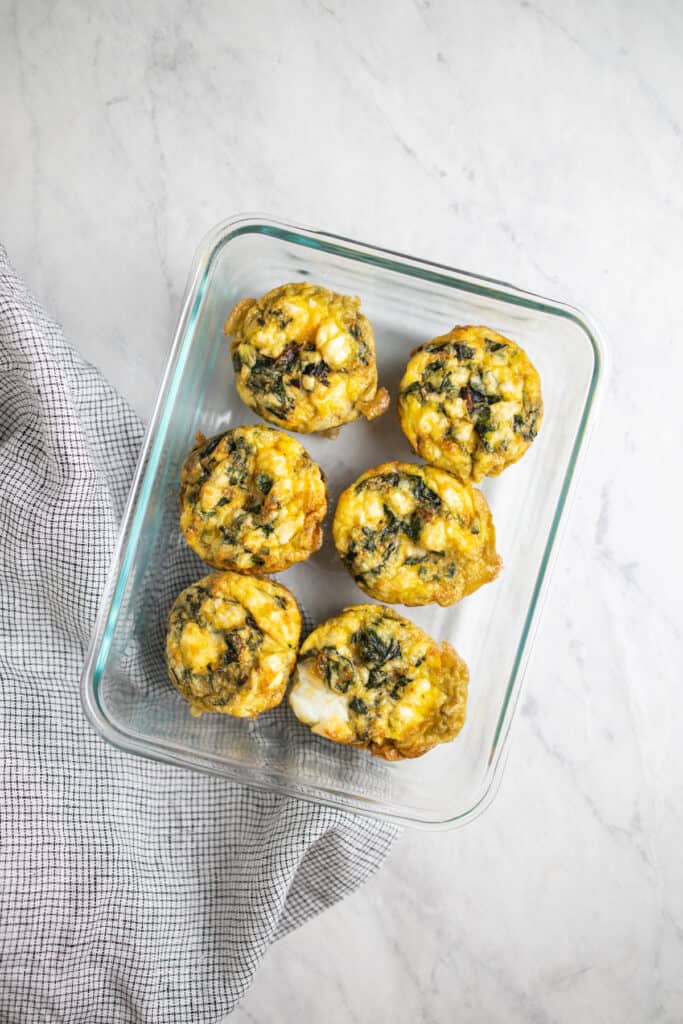
Swiss Chard, Prosciutto & Feta Egg Bites
For breakfast this week, we are making egg bites using our seasonal ingredient, Swiss chard! Since we sautéed a big batch of chard during our prep, we are using one cup of it to make these egg bites.
I add prosciutto and feta to add a nice salty bite but you could omit the prosciutto to keep it vegetarian. Like spinach, make sure you squeeze out any excess liquid from the chard before adding to the egg mixture. In a mixing bowl, combine:
- 4 whole eggs
- 1 cup of sautéed and chopped Swiss chard
- 2 tablespoon of whole milk
- ¼ cup chopped prosciutto (or crumbled bacon)
- ¼ teaspoon kosher salt
- ¼ teaspoon cracked black pepper
Preheat your oven to 350 degrees. Spray a 6 count muffin tin with non stick spray and fill ⅔ full of egg mixture. Then top with crumbled feta cheese (or any cheese of your choice such as goat cheese or sharp cheddar). Bake for roughly 12-15 minutes depending on your oven, or until you can insert a toothpick and it comes out clean.
Silicone muffin pans work the best for these because they won't brown the outside of the egg bites and they will release easily. You can double the recipe to make a full dozen and even freeze some in an airtight container to eat later.
Lunch Meal Prep
Tofu and Hummus Tortilla Wraps
These wraps are great for taking on the go since they don't need to be heated. Like any wrap, you can customize it with any leafy greens or veggies you happen to have on hand.
We will be using these ingredients we already prepped:
- lemon beet hummus
- crispy tofu
- pickled carrots/red onion/cucumber/daikon
For fresh ingredients we’ll need:
- large tortilla
- butter lettuce (or sub romaine, spinach, arugula etc)
- avocado slices
On your tortilla, spread a generous amount of beet hummus layered with your greens, tofu, pickled veggies and avocado. Wrap it up and enjoy for lunch!

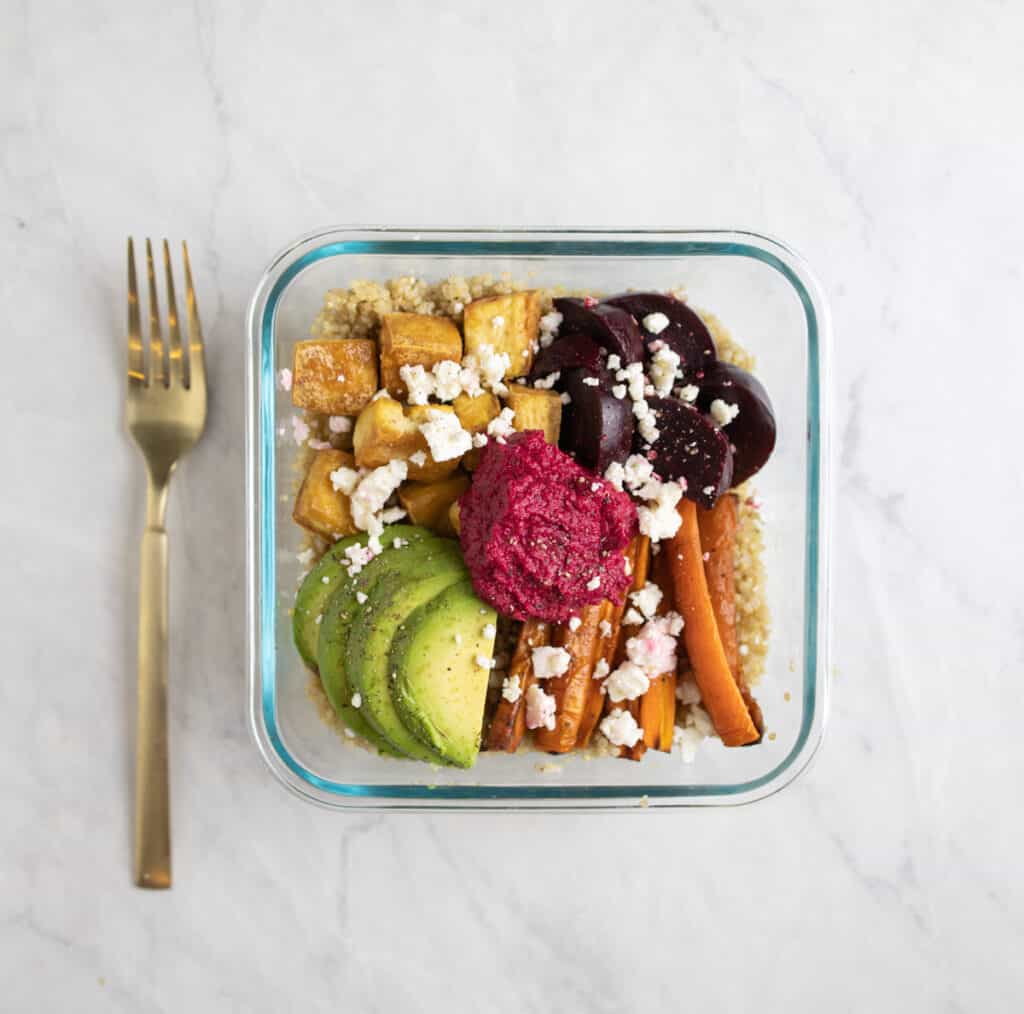
Buddha Bowls with Carrots, Beets, Avocado and Tofu
The name says it all! This quinoa buddha bowl is a tasty vegetarian lunch that will keep you feeling full and fueled all the way until dinner!
We will be using these ingredients we already prepped:
- quinoa
- roasted carrots
- steamed beets
- crispy tofu
- beet hummus
For fresh ingredients we’ll need:
- avocado
- feta or goat cheese
Layer all the ingredients in a bowl and take with you for a lunch you'll look forward to all day!
Dinner Meal Prep
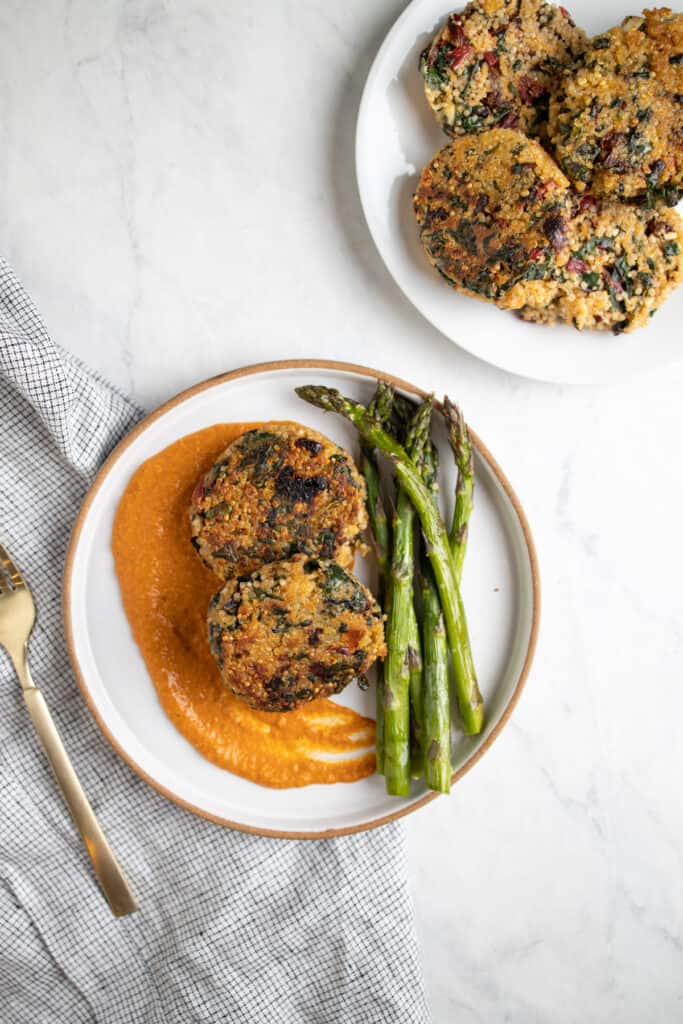
Swiss Chard Quinoa Patties with Romesco and Asparagus
These quinoa patties are one of our favorite dinners! I love to mix it up with different flavors based on what's in season (or in my fridge!). Swiss chard makes a nutritious addition to these flavorful little patties.
We will be using these ingredients we already prepped:
- quinoa
- sauteed swiss chard
For fresh ingredients we’ll need:
- asparagus
- sun dried tomatoes
- eggs
- parmesan
- basil
- garlic and shallot
You can find the full recipe here! Just add a cup of chopped sautéed Swiss chard to the mix. While you saute the patties on the stovetop, you can roast your asparagus in a 400 degree oven for 8-10 minutes with olive oil, salt and pepper.
I like to serve these patties over some warmed up romesco sauce. You can also add some of the roasted carrots to the asparagus for even more veggies!
patties go in the freezer for 30 min to firm up serve over romesco sauce with roasted asparagus
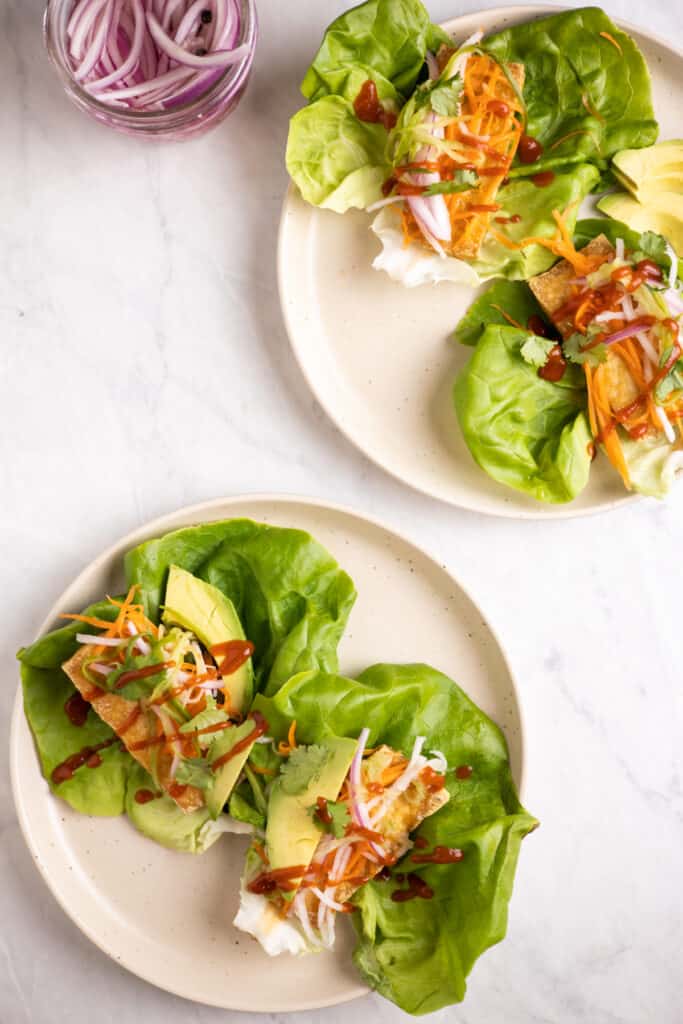
Sriracha Tofu Lettuce Wraps
If you're looking for a super light and healthy meal, these lettuce wraps deliver! You'll be able to eat 4 or 5 easily! The freshness from the crunchy lettuce and pickled veggies is unreal. These would also be a great lunch option.
We will be using these ingredients we already prepped:
- crispy tofu
- pickled veggies
For fresh ingredients we’ll need:
- butter lettuce leaves
- avocado
- sriracha
If you'd like to bulk them up even more, I'd add some quinoa to the wraps, or vermicelli rice noodles to mimic a fresh spring roll. Garnish with fresh cilantro or green onion.
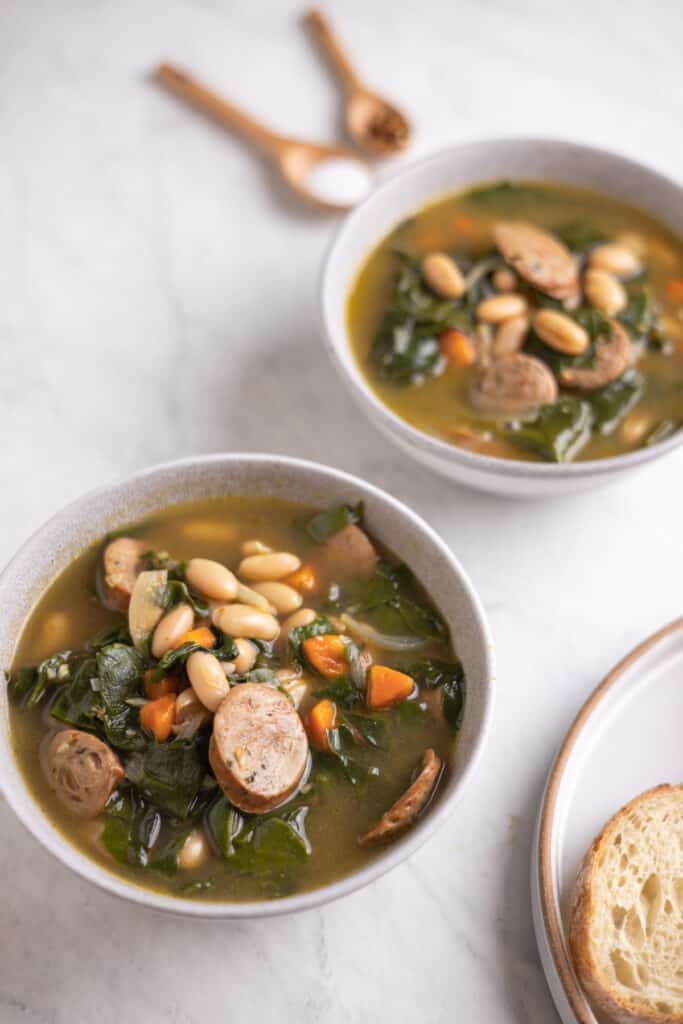
Swiss Chard, Sausage, and White Bean Soup
It may be springtime, but where I live, the temperatures still dip down into the 30's so I'm all for a warm and hearty bowl of soup like this one! If you want to keep things vegetarian you can omit the sausage and add some fresh pasta (like ditalini) to the soup instead.
We will use the remainder of the sautéed Swiss chard to build the base for this soup. Here's what you'll need:
- 1 bundle of swiss chard, cut into bite sized chunks
- 2 chicken sausages, sliced
- 1 carrot, diced
- 1 shallot, small diced
- 2 garlic cloves, minced
- 1 can of Cannellini beans, drained and rinsed
- ¼ teaspoon of cayenne
- 1 quart of chicken stock
- salt and pepper to taste
- 1 parmesan rind *optional*
In a soup pot, warm a tablespoon of cooking oil over medium heat. Brown the sausage in the pan and then remove to a plate. Saute the swiss chard, carrot, and onion until soft. Add the minced garlic and saute for 1 more minute.
Add the sausage back to the pot along with the beans, seasonings, chicken stock and parmesan rind. Bring to a simmer and cook for 10-15 minutes.
Pasta with Romesco, Tomato, Olive and Feta
This pasta actually started out as something I layered into mason jars to prep for cold grab and go lunches. I love it equally as much warmed up for a big bowl of easy weeknight pasta. You can customize it with whatever flavors you might have on hand but for this one we lean on some Mediterranean flavors.
And remember the sausage we used in this week's soup? I highly recommend adding some of that to this pasta!
While we don't have much prepped in advance for this meal, the fact that the sauce is ready to go and we lean on ready to go fridge staples means it comes together in the time it takes to boil pasta.
We will be using these ingredients we already prepped:
For fresh ingredients we’ll need:
- pasta (rotini or penne work well with the romesco)
- cherry tomatoes
- kalamata olives
- feta cheese
- baby kale, spinach, or more swiss chard to add some greens!

Meal Prep Wrap Up
Whew! What a week! If you're still with me at this point I'm impressed! We managed to crank out 1 breakfast, 2 lunches, and 4 dinner with the ingredients we batch cooked. And that's just with my suggestions. I have faith that you will find even more creative ways to build these ingredients into something magical.
As always, I love hearing your ideas so please leave me a comment and tell me what you would create!
I hope this week's meal plan leaves you excited to try cooking with swiss chard and empowers you to tackle the week ahead!
xoxo
Katie

Leave a Reply
You must be logged in to post a comment.